BGGN-213, Lecture 16
Using remote machines (Part I)
The goal of this hands-on session is to run you through a demonstration of the command line on a JetStream instance to do some simple bioinformatics analysis.
1. Logging in to jetstream from your local terminal with a key file
Here we describe the process of connecting to a Jetstream service virtual machine instance (a.k.a a computer in the cloud).
We will connect through SSH, the same mechanism we would use to connect to any remote UNIX based computer.
What are Cryptographic Keys?
Cryptographic keys are a convenient and secure way to authenticate without having to use passwords. They consist of a pair of files called the public and private keys: the public part can be shared with whoever you’d like to authenticate with (in our case, Jetstream!), and the private part is kept “secret” on your machine. Things that are encrypted with the public key can be be decrypted with the private key, but it is computationally intractable (ie, it would take on the order of thousands of years) to determine a private key from a public key. You can read more about it here.
The good news is that there is already a registered public key for our Jetstream account. However, to make use of it, you’ll need the private key. And so, we move on!
Getting the Private Key
The private key for our class account is available from a link we will tell you about in class. You will also need a password to actually download it and the download link will expire after one week. Be sure to select the Direct Download link when you visit the download page.
Connecting to your remote instance via it’s IP address
Find and open your terminal application. On MacOS, you can search for Terminal in finder. Typically it is located in /Applications/Utilities and you may want to keep Terminal in your dock for this class. On Window open Git Bash. Ask Barry if you are unsure here.
We’re going to assume that the key file ended up in your Downloads folder. In your terminal, run:
cd && mv ~/Downloads/bggn213_private_key .
This puts the file in your home folder. Now, we need to set its permissions more strictly:
chmod 600 bggn213_private_key
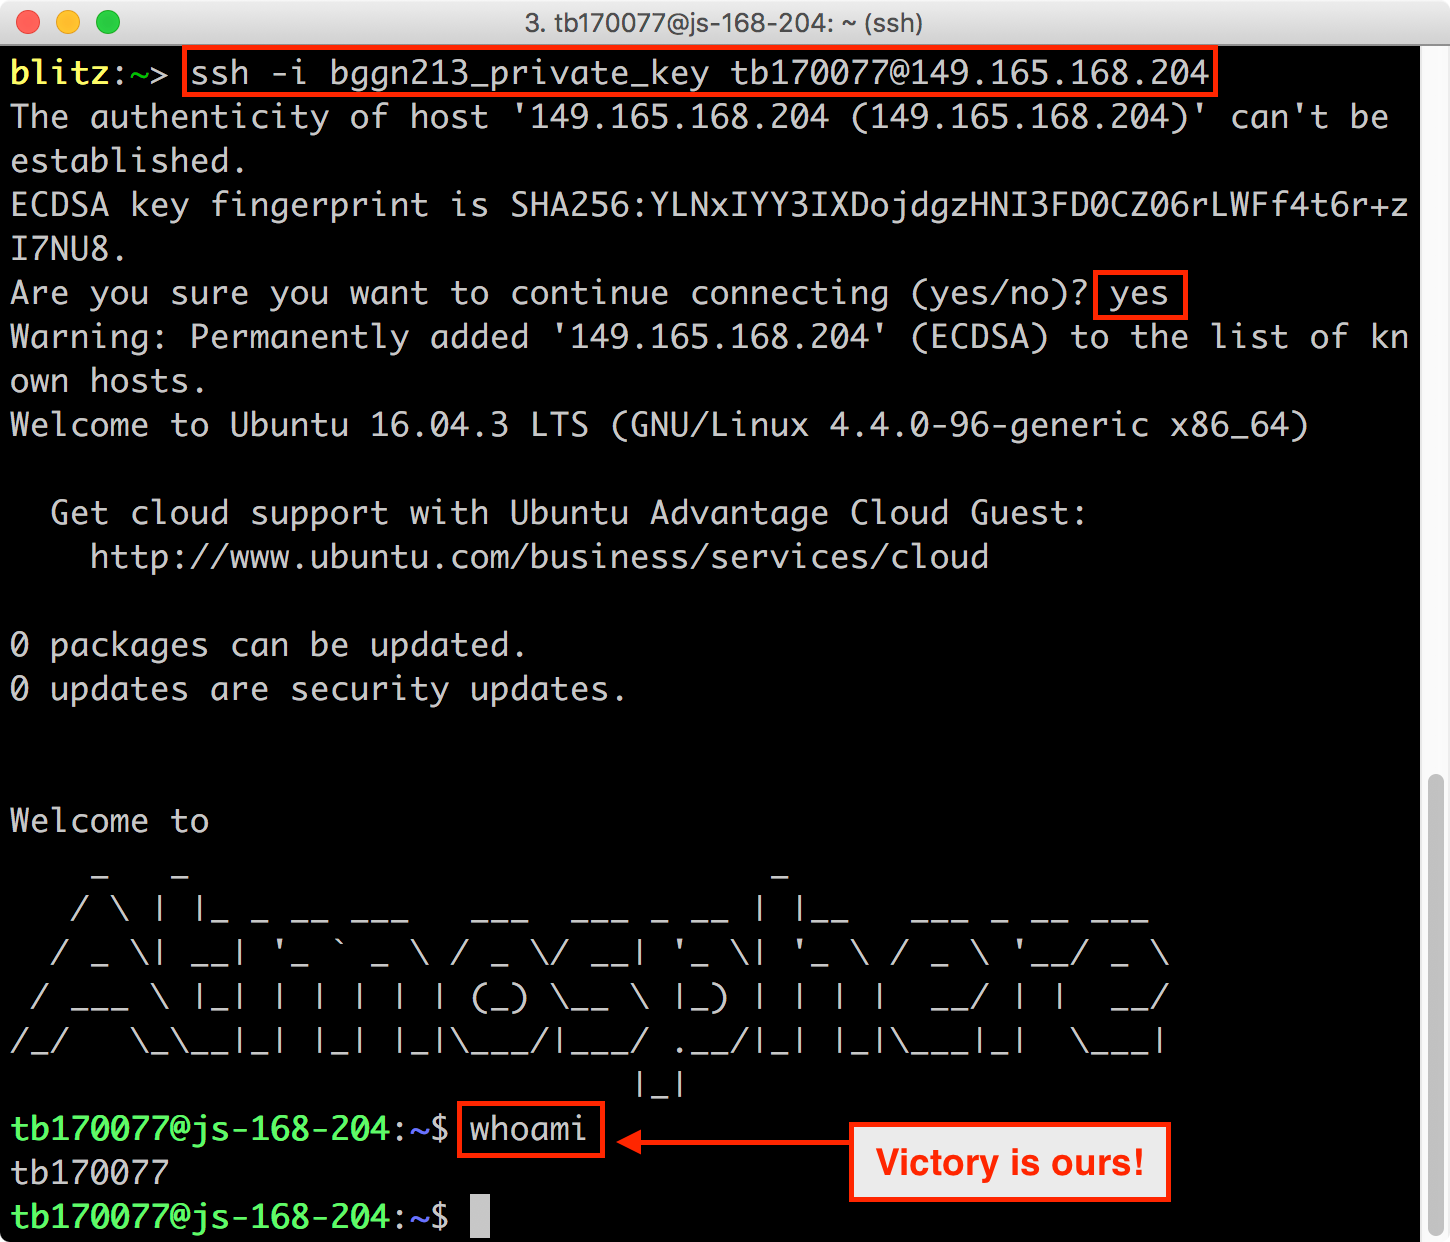
Finally, we can use the IP address Barry assigns to you, along with the common login name and the key, to log in:
ssh -i bggn213_private_key tb170077@YOUR_IP_ADDRESS
You should now have access to your jetstream instance within your local terminal.
2. Update the software on the machine
Copy and paste the following commands into your jetstream instance command line to updates the software list and install the Python programming language and NCBI BLAST+:
sudo apt-get update && sudo apt-get -y install python ncbi-blast+
Please make sure to hit enter after the paste – sometimes the last line doesn’t paste completely.
3. Download some sequences
First we need some data! Let’s grab the mouse and zebrafish RefSeq protein data sets from NCBI, and put them in a new directory that we will create called work. If you’ve just logged in, you should be in your home area already, but if you’re unsure, just run cd by itself and hit enter.
cd
mkdir work
cd work
Check you are where you think you are (i.e. in /home/tb170077/work)
pwd
Now, we’ll use curl to download the files:
curl -O ftp://ftp.ncbi.nih.gov/refseq/M_musculus/mRNA_Prot/mouse.1.protein.faa.gz
curl -O ftp://ftp.ncbi.nih.gov/refseq/M_musculus/mRNA_Prot/mouse.2.protein.faa.gz

curl -O ftp://ftp.ncbi.nih.gov/refseq/D_rerio/mRNA_Prot/zebrafish.1.protein.faa.gz
4. Inspect our sequences
If you look at the files in the current directory, you should see four files, along with a directory called lost+found which is for system information:
ls -l
should show you:
total 30236
-rw-rw-r-- 1 tb170077 tb170077 12122493 May 24 19:37 mouse.1.protein.faa.gz
-rw-rw-r-- 1 tb170077 tb170077  4895934 May 24 19:37 mouse.2.protein.faa.gz
-rw-rw-r-- 1 tb170077 tb170077 13935331 May 24 19:38 zebrafish.1.protein.faa.gz
All three files are FASTA protein files (that’s what the .faa suggests) that are compressed with gzip (that’s what the .gz means).
Uncompress them:
gunzip *.faa.gz
and let’s look at the first few sequences in the file:
head mouse.1.protein.faa
These are protein sequences in FASTA format. FASTA format is something many of you have probably seen in one form or another – it’s pretty ubiquitous. It’s a text file, containing records; each record starts with a line beginning with a ‘>’, and then contains one or more lines of sequence text.
Let’s take those first two sequences and save them to a new file that we will create called mm-first.fa. We’ll do this using output redirection with ‘>’, which says “take all the output and put it into this file here.”
head -11 mouse.1.protein.faa > mm-first.fa
So now, for example, you can do less mm-first.fa to see the contents of that file (or more mm-first.fa). Type spacebar to move down and ‘q’ to get out of paging mode.
Now let’s BLAST these two sequences against the entire zebrafish protein data set. First, we need to tell BLAST that the zebrafish sequences are (a) a database, and (b) a protein database. That’s done by calling ‘makeblastdb’:
makeblastdb -in zebrafish.1.protein.faa -dbtype prot
5. Running our first command line BLAST
Next, we call BLAST to do the search:
blastp -query mm-first.fa -db zebrafish.1.protein.faa
This should run pretty quickly, but you’re going to get a lot of output!! To save it to a file instead of watching it go past on the screen, ask BLAST to save the output to a file that we’ll name mm-first.x.zebrafish.txt:
blastp -query mm-first.fa -db zebrafish.1.protein.faa -out mm-first.x.zebrafish.txt
and then you can ‘page’ through this file at your leisure by typing:
less mm-first.x.zebrafish.txt
(Type spacebar to move down, and ‘q’ to get out of paging mode.)
6. Running more BLAST jobs
Let’s do some more sequences (this one will take a little longer to run):
head -500 mouse.1.protein.faa > mm-second.fa
blastp -query mm-second.fa -db zebrafish.1.protein.faa -out mm-second.x.zebrafish.txt
will compare the first 83 sequences. You can look at the output file with:
less mm-second.x.zebrafish.txt
(and again, type ‘q’ to get out of paging mode.)
Notes:
you can execute multiple commands at a time;
You might see a warning -
Selenocysteine (U) at position 310 replaced by Xwhat does this mean?
why did it take longer to BLAST
mm-second.fathanmm-first.fa?
Things to mention and discuss:
blastpoptions and -help.- command line options, more generally - why so many?
- automation rocks!
Other topics to discuss:
- when you shut down a VM, you lose all your data
- what computer(s) is this all happening on?
> Next…
Next we’re going to become more familiar with running longer programs and analysis work-flows on the command line.
